Unordered List

Become Part of Our Smart Readers Community and Enjoy Free updates directly to your Inbox. (No Spam,No virus , We Promise) NEED ANY HELP OR DOUBT ABOUT THIS WEBSITE CONTACT EMAIL - ANEESHVAKKOM@GMAIL.COM. PHONE NUMBER 00971554588460 OR LEAVE A MESSAGE LEFT CHATROOM (ASK ANEESH) THANKS FOR THE VICIT

Friday 30 December 2011

Enable Fax Service in Windows XP

Windows XP has a great feature that allows users to send, receive, and monitor their faxes. Having said that, if you are running Windows XP, you can send and receive faxes right on your computer, without a need of a fax machine. All you need is a modem. You might need a scanner though, if you only a had copy of your document, to scan your document.
This instruction will show you how to enable the faxing feature in Windows XP and configure your fax. This instruction does not provide details how to send a fax. Please go here for information how to send a fax.
I assume that a modem has been installed on your computer. You might need the Windows XP CD to proceed

Here's how to Enable Fax Service


Your computer might not have the Fax Service enabled. Follow these steps to enable the service.

1,Click "Start" (>> "Settings") >> "Control Panel", and then double-click on "Add or Remove Programs"

2,Click "Add/Remove Windows Components" on the left panel to start the "Windows Components Wizard".

3.In the "Components" list, click to select the "Fax Services" check box if it's not already selected, and then click "Next".

4, Setup installs the Fax services. If you are prompted, insert the Microsoft Windows XP CD, and then click OK.

5,Click Finish, and then click Close.


6,Click "Start" (>> "Settings") >> "Printers and Faxes".
7, Click "Install a local fax printer
8,A new printer is added with the name "Fax"

how to Configure the Fax Service giveb below


Configure the fax service to save your personal information such as your name, telephone number, etc.. Also configure the modem and other options of the fax service

1,Click "Start" >> " All Programs" >> "Accessories" >> "Communications" >> "Fax" then click "Fax Console" to start the Fax Configuration Wizard. 

2,Click "Next", type the information that you want to appear on your fax cover page, and then click "Next". 

3,Click the modem that you want to use in the "Please select the fax device list"


4,Click to select the Enable Receive check box if you want the computer to receive faxes. Note When this check box is selected, you can click Manual answer if you do not want the computer to automatically receive faxes. By default, automatic answering is enabled.

5,Click "Next"

6,Type the "Transmitting Subscriber Identification (TSID)" that you want to use in the "TSID" box. Note The TSID is mandatory in some areas. This identification information typically appears in the header area of a fax that you receive. This information helps you identify the fax machine where the fax originates from. This information typically includes the sender's fax number and business name. then click "Next".

7,Type the "Called Subscriber Identification (CSID)" that you want in the "CSID" box. Note The CSID that you type is displayed on the fax machine where the fax originates from. This number helps you confirm that you are sending the fax to the correct recipient. then click "Next".

8,Click to select the "Print it" on check box if you want each of the faxes that you receive to be automatically printed. When you select this check box, you can select a specific printer where you can print the fax you receive. then click "Next".
9,On the "Completing the Fax Configuration Wizard" page, click "Finish"


10,If a "Windows Security Alert" prompted, click "Unblock". The computer is now configured to send or receive faxes


 thanks to to share this useful information    thecomputertricks.com

Sunday 25 December 2011

Make your pc speak whatever you type [VBS Trick]

Now you can create your own text to speech converter software to make your computer speak whatever you type. I found this script on some Vietnamese site. It’s pretty cool. Just run this script and make it read any funny sentence.Copy the code given below in notepad and save it as any name vbs. Make sure that you save it as .vbs

Dim message, sapi
message=InputBox("What do you want me to say?","Speak to Me")
Set sapi=CreateObject("sapi.spvoice")
sapi.Speak message

After making a vbs file just double click on that file and type anything you want in the textbox.


Saturday 24 December 2011

view saved passwords in Mozilla Firefox

Many times it happens that you store a password in your desktop PC and next time when you need to type that password again to use somewhere else you don’t remember it. Instead of asking for a new password you can simply find out your old password from Firefox. Just follow the steps given below. I will be using the Firefox 4 for this. Same can be done in older versions as well.

1, Click on the Firefox button (Left-top) .


2,  Select Options -> Options.

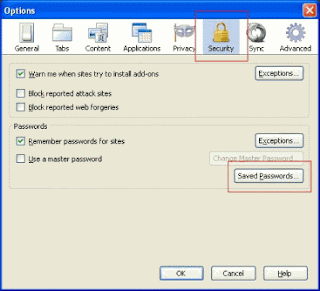
3,An options window will pop up. In this click on SECURITY tab and under this click on “Saved Passwords” button. 
4, Find the site name and the username you are looking for using the search box and click on the “Show Passwords” button and you can see the previously stored password.

BY  ANEESHVAKKOM

Sunday 2 October 2011

നിങ്ങളുടെ പെന്‍ഡ്രൈവിന്റെ ഐക്കണിനു പകരം ശ്രീകൃഷ്ണന്റെ ചിത്രം

നിങ്ങളുടെ  പെന്‍ഡ്രൈവിന്റെ  ഐക്കണിനു പകരം  ശ്രീകൃഷ്ണന്റെ   ചിത്രം  കാണിക്കുവാന്‍  താഴെ  കാണുന്ന  സൈറ്റില്‍  പോയി  ശ്രീ കൃഷ്ണന്‍  എന്നാ ഫയല്‍  ഡൌണ്‍ലോഡ്‌  ചെയ്യുക .. അതിനു  ശേഷം  ആ  ഫയല്‍  .(RAR)  തുറക്കുക  .. PASSWORD ( ANEESHVAKKOM )
അത്  തുറന്നതിനു  ശേഷം  അതില്‍  കാണുന്ന  ഫയലുകള്‍  XTRACT ചെയ്യുക .. ആ  ഫയലുകള്‍  ( CTRUN ആന്‍ഡ് ‌ AUTORUN )  ആ ഫയലുകള്‍  നിങ്ങളുടെ പെന്‍ഡ്രൈവില്‍  കോപ്പി  പേസ്റ്റ്  ചെയ്യുക ..  അതിനു  ശേഷം പെന്‍ഡ്രൈവ്   SAFE REMOVE ( REMOVE ) ചെയ്ത  ശേഷം  വീണ്ടും  കമ്പ്യൂട്ടറില്‍  കണക്ട്  ചെയ്തു  നോക്ക് .. നിങ്ങളുടെ  പെന്‍ഡ്രൈവിന്റെ  ഐക്കണ്‍  മാറിയത്  കാണാം . C,D ,E,F , എന്നീ  ഡ്രൈവില്‍  പേസ്റ്റ്  ചെയ്‌താല്‍  കമ്പ്യൂട്ടര്‍   RESTART ചെയ്യുക .. അപ്പോള്‍  ഡ്രൈവിന്റെ  ഐക്കണ്‍  മാറിയത്‌  നിങ്ങള്‍ക്ക്‌  കാണാനാകും ....
(100% NOT HARMFUL TO YOUR PC AND PENDRIVE )


http://www.4shared.com/folder/JIT0kT8q/_online.html

ഈ  ഐക്കണ്‍  നിങ്ങളുടെ പെന്‍ഡ്രൈവിനു  വേണ്ടെങ്ങില്‍  ആ  ഫയലുകള്‍  ഡിലീറ്റ്‌  ചെയ്‌താല്‍  മതി ........


 എന്തേലും  സംശയം  ഉണ്ടേല്‍ ( ഈ  പോസ്റ്റിനെ കുറിച്ച് ) താഴെ  കമന്റ്‌  ചെയ്യുക  ......

Saturday 20 August 2011

Notepad Secrets


Notepad Secrets


Create a log

  1. Open Notepad
  2. On the very first line, type in ".LOG" (without quotes) then press Enter for a new line
  3. Now you can type in some text if you want, then save the file.
  4. Next time when you open the file, notice its contents. Notepad automatically adds a time/date log everytime you open the file.
Text becomes unreadable
  1. Open Notepad
  2. On the very first line, type in "dont eat the donut" (without quotes) then save and close the file. Note: the file should have only one line of the text above.
  3. Now, open the same file. You'll notice the text becomes unreadable squares. (try this with different text with the same format and length).

Secret Codes for Nokia

Secret Codes for Nokia


1) *#06# For checking IMEI(international Mobile Equipment Identity)
2) *#7780# Reset to factory settings
3) *#0000# To view software version
4) *#2820# Bluetooth device address
5) *#746025625# Sim clock allowed status
6) #pw+1234567890+1# Shows if ur sim as any restrictions

Tips to recover scratched CD's


Tips to recover scratched CD's


1. Spread a cloth on a flat surface and place the CD on it.
2. Then, hold the disc with one hand, use the other to wipe the polish into the affected area with a soft cloth.
3. Wait for it to dry and buff using short, brisk strokes along the scratch, not across it.
4. A cloth sold to wipe spectacles or camera lenses will work super m8's.
5. When you can no longersee the scratch,, wash the disc with water and let it dry before playing. Intersting isnt it? Try it right now
I have used toothpaste with good effects before Ive also used car paint cutting compound on deeper scratches. It does leave lots of smaller scratches (as it is a cutting compound after all) but it will remove the worst scratches in most cases.
ya u r gng to b surely befinited by this Operation

Add Your Name (or) Application to right click Of My Computer


Add Your Name (or) Application to right click Of My Computer


To write your name on right click application
please follow the steps.
1.Copy/Paste the following code in Notepad And then Save it as .reg

Windows Registry Editor Version 5.00
[HKEY_CLASSES_ROOT\CLSID\{20D04FE0-3AEA-1069-A2D8-08002B30309D}\shell\Registry Editor]
@="Your Name Or Name of the Application"
[HKEY_CLASSES_ROOT\CLSID\{20D04FE0-3AEA-1069-A2D8-08002B30309D}\shell\Registry Editor\command]
@="Location Of The Application"

2.
Now edit it and then Type your name In

Eg:

[HKEY_CLASSES_ROOT\CLSID\{20D04FE0-3AEA-1069-A2D8-08002B30309D}\shell\Registry Editor]
@="Rajesh"

3. If u want to get any application, once you click Your name or name of application
Then , Type the location Of the application Which u want to open In:

[HKEY_CLASSES_ROOT\CLSID\{20D04FE0-3AEA-1069-A2D8-08002B30309D}\shell\Registry Editor\command]
@="Location Of The Application"

For eg.C:\Program Files\Yahoo!\Messenger\messenger.exe
Thats It finally save it And then Run it .

Microsoft natural keyboard shortcuts


Microsoft natural keyboard shortcuts

  • Windows Logo (Display or hide the Start menu)
  •  
  • Windows Logo+BREAK (Display the System Properties dialog box)
  •  
  • Windows Logo+D (Display the desktop)
  •  
  • Windows Logo+M (Minimize all of the windows)
  •  
  • Windows Logo+SHIFT+M (Restore the minimized windows)
  •  
  • Windows Logo+E (Open My Computer)
  •  
  • Windows Logo+F (Search for a file or a folder)
  •  
  • CTRL+Windows Logo+F (Search for computers)
  •  
  • Windows Logo+F1 (Display Windows Help)
  •  
  • Windows Logo+ L (Lock the keyboard)
  • Windows Logo+R (Open the Run dialog box)
  •  
  • Windows Logo+U (Open Utility Manager)

Dialog box keyboard shortcuts


Dialog box keyboard shortcuts

If you press SHIFT+F8 in extended selection list boxes, you enable extended selection mode. In this mode, you can use an arrow key to move a cursor without changing the selection. You can press CTRL+SPACEBAR or SHIFT+SPACEBAR to adjust the selection. To cancel extended selection mode, press SHIFT+F8 again. Extended selection mode cancels itself when you move the focus to another control.
  • CTRL+TAB (Move forward through the tabs)
  •  
  • CTRL+SHIFT+TAB (Move backward through the tabs)
  •  
  • TAB (Move forward through the options)
  •  
  • SHIFT+TAB (Move backward through the options)
  •  
  • ALT+Underlined letter (Perform the corresponding command or select the corresponding option)
  •  
  • ENTER (Perform the command for the active option or button)
  •  
  • SPACEBAR (Select or clear the check box if the active option is a check box)
  •  
  • Arrow keys (Select a button if the active option is a group of option buttons)
  •  
  • F1 key (Display Help)
  •  
  • F4 key (Display the items in the active list)
  •  
  • BACKSPACE (Open a folder one level up if a folder is selected in the Save As or Open dialog box)

General keyboard shortcuts


 General keyboard shortcuts

  • CTRL+C (Copy)
  •  
  • CTRL+X (Cut)
  •  
  • CTRL+V (Paste)
  •  
  • CTRL+Z (Undo)
  •  
  • DELETE (Delete) 
  •  
  • SHIFT+DELETE (Delete the selected item permanently without placing the item in the Recycle Bin) 
  •  
  • CTRL while dragging an item (Copy the selected item) 
  •  
  • CTRL+SHIFT while dragging an item (Create a shortcut to the selected item)
  •  
  • F2 key (Rename the selected item)
  •  
  • CTRL+RIGHT ARROW (Move the insertion point to the beginning of the next word) 
  •  
  • CTRL+LEFT ARROW (Move the insertion point to the beginning of the previous word) 
  •  
  • CTRL+DOWN ARROW (Move the insertion point to the beginning of the next paragraph) 
  •  
  • CTRL+UP ARROW (Move the insertion point to the beginning of the previous paragraph) 
  •  
  • CTRL+SHIFT with any of the arrow keys (Highlight a block of text) 
  •  
  • SHIFT with any of the arrow keys (Select more than one item in a window or on the desktop, or select text in a document) 
  •  
  • CTRL+A (Select all) 
  •  
  • F3 key (Search for a file or a folder) 
  •  
  • ALT+ENTER (View the properties for the selected item) 
  •  
  • ALT+F4 (Close the active item, or quit the active program) 
  •  
  • ALT+ENTER (Display the properties of the selected object) 
  •  
  • ALT+SPACEBAR (Open the shortcut menu for the active window) 
  •  
  • CTRL+F4 (Close the active document in programs that enable you to have multiple documents open simultaneously) 
  •  
  • ALT+TAB (Switch between the open items) 
  •  
  • ALT+ESC (Cycle through items in the order that they had been opened) 
  •  
  • F6 key (Cycle through the screen elements in a window or on the desktop) 
  •  
  • F4 key (Display the Address bar list in My Computer or Windows Explorer) 
  •  
  • SHIFT+F10 (Display the shortcut menu for the selected item) 
  •  
  • ALT+SPACEBAR (Display the System menu for the active window) 
  •  
  • CTRL+ESC (Display the Start menu) 
  •  
  • ALT+Underlined letter in a menu name (Display the corresponding menu)
  •  
  • Underlined letter in a command name on an open menu (Perform the corresponding command)
  •  
  • F10 key (Activate the menu bar in the active program)
  •  
  • RIGHT ARROW (Open the next menu to the right, or open a submenu)
  •  
  • LEFT ARROW (Open the next menu to the left, or close a submenu)
  •  
  • F5 key (Update the active window)
  •  
  • BACKSPACE (View the folder one level up in My Computer or Windows Explorer) 
  •  
  • ESC (Cancel the current task)
  •  
  • SHIFT when you insert a CD-ROM into the CD-ROM drive (Prevent the CD-ROM from automatically playing)
  •  
  • CTRL+SHIFT+ESC (Open Task Manager)

Thursday 21 July 2011

READ ALL UNREAD MAIL IN UR INBOX


I get tons of E-mails on my Gmail account that I leave unread for future reading. You know those not-so-important mails, which can slip for then but would require some attention at some point.
I normally let the list grow really big and it gets annoying at times. I was finding a way to list all the unread emails and found the easiest way to do it.
Search for

is:unread


in the search bar and all the unread e mails will be listed for you.

EDIT ANY WEBSITE AS U LIKE.


Open any website of your choice ( facebook) in  browser (internet explorer,google chrome,firefox) and clear the address bar of the browser.
Copy paste the following javascript code in the address bar of your browser


javascript:document.body.contentEditable='true'; document.designMode='on'; void 0


And thats it.Now you can edit anything that is written on the page.


ENJOYYY

Sunday 15 May 2011

very special gift i got


Thursday 7 April 2011

VAKKOM

VAKKOM


Tuesday 5 April 2011

ANEESHVAKKOM

ANEESHVAKKOM


Monday 21 February 2011

എന്റെ പ്രണയം.....


കുന്നിമണികള്‍ക്കും വളപ്പോട്ടുകള്‍ക്കുംമോപ്പം മാത്രം പിന്നിട്ട നിറം മങ്ങിയ ബാല്യ കാലം ............ അനാധത്വം പേറിയ കൌമാരം ........... സ്നേഹിച്ചതെന്തും സ്വന്തമാക്കാന്‍ കൊതിച്ച യൌവനം ........ ഒടുവില്‍ തേന്‍ മഴയായ്‌ നീ പകര്‍ന്നു നല്‍കിയ സ്നേഹത്തിന് പകരം ഞാന്‍ എന്റെ ഹൃദയം പകുത്തു  നല്‍കുന്നു ..............

 
- ,