Unordered List

Become Part of Our Smart Readers Community and Enjoy Free updates directly to your Inbox. (No Spam,No virus , We Promise) NEED ANY HELP OR DOUBT ABOUT THIS WEBSITE CONTACT EMAIL - ANEESHVAKKOM@GMAIL.COM. PHONE NUMBER 00971554588460 OR LEAVE A MESSAGE LEFT CHATROOM (ASK ANEESH) THANKS FOR THE VICIT

Saturday, 17 March 2012

WE CAN FIND IP ADDRESS OF THE SENDER IN GMAIL


When you receive an email, you receive more than just the message. The email comes with headers that carry important information that can tell where the email was sent from and possibly who sent it. For that, you would need to find the IP address of the sender. The tutorial below can help you find the IP address of the sender. Note that this will not work if the sender uses anonymous proxy servers.

Finding IP address in Gmail:

1.Log into your Gmail account with your username and password.

2. Open the mail.

3. To display the headers,* Click on More options corresponding to that thread. You should get a bunch of links.* Click on Show original.

4. You should get headers like this:Gmail headers : nameLook for Received: from followed by a few hostnames and an IP address between square brackets. In this case, it is65.119.112.245.That is be the IP address of the sender!

5. Track the IP address of the sender. 

BY    ANEESHVAKKOM

"Delete administrator Password" without any software


1,if you are using FAT

Boot up with DOS and delete the sam.exe and sam.log files from Windows\system32\config in your hard drive. Now when you boot up in NT the password on your built-in administrator account which will be blank (i.e No password). This solution works only if your hard drive is FAT kind

2,if you are using NTFS

Step 1. Put your hard disk of your computer in any other pc .
Step 2. Boot that computer and use your hard disk as a secondary hard disk (D'nt boot as primary hard disk ).
Step 3. Then open that drive in which the victim’s window(or your window) is installed.
Step 4. Go to location windows->system32->config
Step 5. And delete SAM.exe and SAM.log
Step 6. Now remove hard disk and put in your computer.
Step 7. And boot your computer 


BY   ANEESHVAKKOM

Friday, 16 March 2012

MY CHAT ROOM BY ANEESHVAKKOM


ANEESHVAKKOM :.

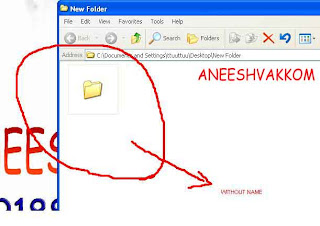
Make a FOLDER Without name


As you are a computer user. You will also know. That the computer does not make withuot name folder. That’s because, this feature is work in computer visual use. If you try to create a without name folder, it will be returned to his original name. In this post I will explain that how you can create a  folder without name…
—————————
Step1: Create a New Folder (by Right-clicking on your Desktop and go to New >>Folder).

Step2: Press F2 (to rename the folder) and Delete the All Text of Folder using Backspace button on your keyboard

Step3: Then Press and Hold Alt and type 0160  Then Press Enter.

Your Without name Folder has been Created!!


by ANEESHVAKKOM

Thursday, 26 January 2012

multiple login for google talk


1)Right click on the Google Talk shortcut.
2)Click on Properties.

3)Go to Shortcut tab on Google Talk Properties window.
4)On the Target textbox, add in the /nomutex to the end of the line so that it looks like below (or you can simply copy and paste the below syntax and replace the original).
“c:\program files\google\google talk\googletalk.exe” /nomutex
5)Click on OK.

I didn't have to do anything after this.
Clicking on the shortcut multiple times just gave me different Google-talk window.

However if that doesn't work then just try this out!!!!

To create a new shortcut for Google Talk:

1)Right-click on the desktop or anywhere you want to place the GTalk shortcut.
2)Select New on the right click context menu.
3)Then select Shortcut.
4)Copy and paste the following line to the text box when prompted to type the location of the item:
“c:\program files\google\google talk\googletalk.exe” /nomutex

5)Click on Next.
6)Give the shortcut a proper name such as Google Talk or Google
Talk Multiple or Google Talk Polygamy.
8)Click OK until you are done

LETS ENJOY .. ANY DOUTS COMMENT PLEASE .

Lock folder without downloading any software ...


cls
@ECHO OFF
title Folder Locker
if EXIST "Control Panel.{21EC2020-3AEA-1069-A2DD-08002B30309D}" goto UNLOCK
if NOT EXIST Locker goto MDLOCKER
:CONFIRM
echo Are you sure u want to Lock the folder(Y/N)
set/p "cho=>"
if %cho%==Y goto LOCK
if %cho%==y goto LOCK
if %cho%==n goto END
if %cho%==N goto END
echo Invalid choice.
goto CONFIRM
:LOCK
ren Locker "Control Panel.{21EC2020-3AEA-1069-A2DD-08002B30309D}"
attrib +h +s "Control Panel.{21EC2020-3AEA-1069-A2DD-08002B30309D}"
echo Folder locked
goto End
:UNLOCK
echo Enter password to Unlock folder
set/p "pass=>"
if NOT %pass%==type your password here goto FAIL
attrib -h -s "Control Panel.{21EC2020-3AEA-1069-A2DD-08002B30309D}"
ren "Control Panel.{21EC2020-3AEA-1069-A2DD-08002B30309D}" Locker
echo Folder Unlocked successfully
goto End
:FAIL
echo Invalid password
goto end
:MDLOCKER
md Locker
echo Locker created successfully
goto End
:End


now go for following few steps
1.copy above folder into notepad.
2.the text which is written in bold letters delete it & type u r password there.
3.save that file by extension .bat ( name is u r choice)
4.now on ur screen a bat file will appear.
5.double click on that file.
6.u will see the locker folder.
7.save the files in that folder.
8.double click on that folder & lock that folder
9.after locking that folder it will become hidden.
10.to open that folder double click on that bat file
11.type ur password & open that folder.

Friday, 30 December 2011

Enable Fax Service in Windows XP

Windows XP has a great feature that allows users to send, receive, and monitor their faxes. Having said that, if you are running Windows XP, you can send and receive faxes right on your computer, without a need of a fax machine. All you need is a modem. You might need a scanner though, if you only a had copy of your document, to scan your document.
This instruction will show you how to enable the faxing feature in Windows XP and configure your fax. This instruction does not provide details how to send a fax. Please go here for information how to send a fax.
I assume that a modem has been installed on your computer. You might need the Windows XP CD to proceed

Here's how to Enable Fax Service


Your computer might not have the Fax Service enabled. Follow these steps to enable the service.

1,Click "Start" (>> "Settings") >> "Control Panel", and then double-click on "Add or Remove Programs"

2,Click "Add/Remove Windows Components" on the left panel to start the "Windows Components Wizard".

3.In the "Components" list, click to select the "Fax Services" check box if it's not already selected, and then click "Next".

4, Setup installs the Fax services. If you are prompted, insert the Microsoft Windows XP CD, and then click OK.

5,Click Finish, and then click Close.


6,Click "Start" (>> "Settings") >> "Printers and Faxes".
7, Click "Install a local fax printer
8,A new printer is added with the name "Fax"

how to Configure the Fax Service giveb below


Configure the fax service to save your personal information such as your name, telephone number, etc.. Also configure the modem and other options of the fax service

1,Click "Start" >> " All Programs" >> "Accessories" >> "Communications" >> "Fax" then click "Fax Console" to start the Fax Configuration Wizard. 

2,Click "Next", type the information that you want to appear on your fax cover page, and then click "Next". 

3,Click the modem that you want to use in the "Please select the fax device list"


4,Click to select the Enable Receive check box if you want the computer to receive faxes. Note When this check box is selected, you can click Manual answer if you do not want the computer to automatically receive faxes. By default, automatic answering is enabled.

5,Click "Next"

6,Type the "Transmitting Subscriber Identification (TSID)" that you want to use in the "TSID" box. Note The TSID is mandatory in some areas. This identification information typically appears in the header area of a fax that you receive. This information helps you identify the fax machine where the fax originates from. This information typically includes the sender's fax number and business name. then click "Next".

7,Type the "Called Subscriber Identification (CSID)" that you want in the "CSID" box. Note The CSID that you type is displayed on the fax machine where the fax originates from. This number helps you confirm that you are sending the fax to the correct recipient. then click "Next".

8,Click to select the "Print it" on check box if you want each of the faxes that you receive to be automatically printed. When you select this check box, you can select a specific printer where you can print the fax you receive. then click "Next".
9,On the "Completing the Fax Configuration Wizard" page, click "Finish"


10,If a "Windows Security Alert" prompted, click "Unblock". The computer is now configured to send or receive faxes


 thanks to to share this useful information    thecomputertricks.com

Sunday, 25 December 2011

Make your pc speak whatever you type [VBS Trick]

Now you can create your own text to speech converter software to make your computer speak whatever you type. I found this script on some Vietnamese site. It’s pretty cool. Just run this script and make it read any funny sentence.Copy the code given below in notepad and save it as any name vbs. Make sure that you save it as .vbs

Dim message, sapi
message=InputBox("What do you want me to say?","Speak to Me")
Set sapi=CreateObject("sapi.spvoice")
sapi.Speak message

After making a vbs file just double click on that file and type anything you want in the textbox.


Saturday, 24 December 2011

view saved passwords in Mozilla Firefox

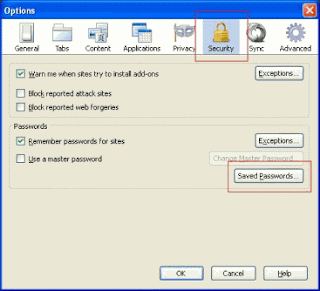
Many times it happens that you store a password in your desktop PC and next time when you need to type that password again to use somewhere else you don’t remember it. Instead of asking for a new password you can simply find out your old password from Firefox. Just follow the steps given below. I will be using the Firefox 4 for this. Same can be done in older versions as well.

1, Click on the Firefox button (Left-top) .


2,  Select Options -> Options.

3,An options window will pop up. In this click on SECURITY tab and under this click on “Saved Passwords” button. 
4, Find the site name and the username you are looking for using the search box and click on the “Show Passwords” button and you can see the previously stored password.

BY  ANEESHVAKKOM

 
- ,